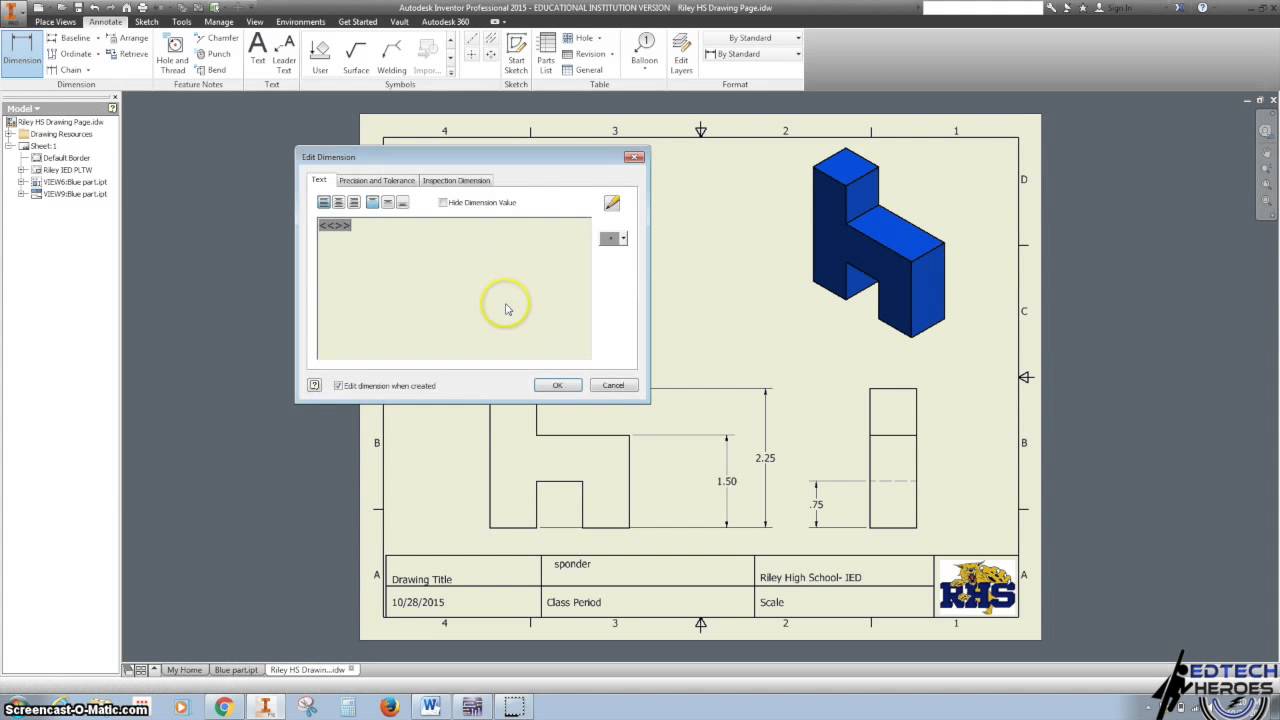
On the ribbon, click place views tab create panel base. To edit this information, click the inventor icon at the very top right and select iproperties.
Sketch To Drawing Inventor, The rectangular pattern dialog box opens and select mode is active by default. You will see like a matrix of each plane (x, y, z). Within autocad you normally trim, extend, copy, mirror, hack, slash, and do whatever necessary to create the required geometry in as little of time.

You can copy autocad data to the clipboard and paste it into an inventor sketch, or import autocad files directly into an inventor sketch. Use commands on the sketch tab to create the sketch geometry. In the graphics window, click to place the view. To begin an inventor 3d sketch, simply click the start 3d sketch button on the ribbon.
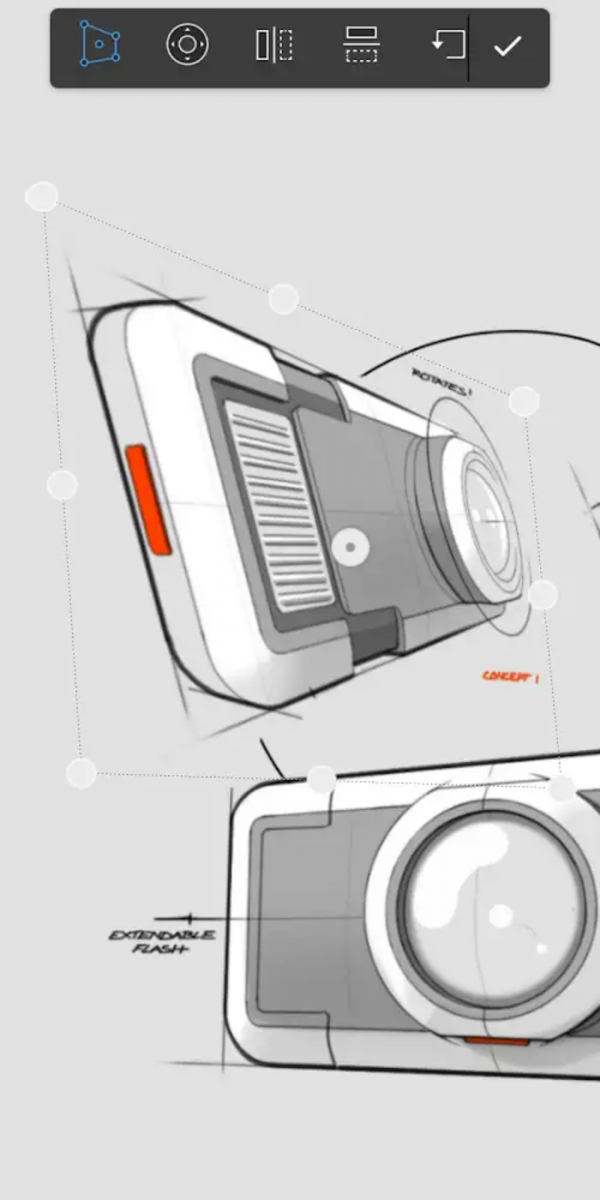
Dimension and Draw Inventor Drawing Sheet YouTube from Sketchart and Viral Category
Click a planar face or work plane of a part and, in the mini toolbar, choose create sketch. Use the sketch commands to create one or more sketches that form a closed loop. Here you can edit the information that will appear in the lower box. If you want to draw a line in a sketch, you select the line button and then you input what inventor requires. During that time, i was asked how to make sure that all my text and symbols will move with a view. How to draw a sketch in inventor?

Pin on VISION BOARD, Within autocad you normally trim, extend, copy, mirror, hack, slash, and do whatever necessary to create the required geometry in as little of time. You have to manually reposition it which can be time consuming if you attached many symbols in a view for example. Click a planar face or work plane of a part and, in the mini toolbar,.

INVENTOR BRANDON OWENS� PORTFOLIO, To create a sketch in a part or assembly file, do one of the following: On the ribbon, click place views tab sketch panel create sketch. Start in a drawing sketch. If the part file contains: Navigate to the folder that contains the image file and then click open.

Inventor Drawings by Steven Paulsen at, Part models created in autodesk inventor start with sketches, which you create by drawing geometric elements such as points, lines, shapes, and arcs. To create a sketch in a drawing file, click place views tab > start sketch. Leave a comment posted by inventor p on may 17, 2012. Click on the ‘project geometry’ button and click on the center.

Inventor Drawing Walkthru YouTube, This is used to keep track of approval and who has seen or edited the part. To create a sketch in a drawing file, click place views tab > start sketch. Part models created in autodesk inventor start with sketches, which you create by drawing geometric elements such as points, lines, shapes, and arcs. To create a sketch in a.

Autodesk Inventor Sketch Over Image File YouTube, To edit this information, click the inventor icon at the very top right and select iproperties. To begin an inventor 3d sketch, simply click the start 3d sketch button on the ribbon. Use commands on the sketch tab to create the sketch geometry. Part models created in autodesk inventor start with sketches, which you create by drawing geometric elements such.

Autodesk Inventor Tutorial 13 How to make Exercise 983, To edit this information, click the inventor icon at the very top right and select iproperties. Click insert, and then select insert image. If you’ve used inventor for a while, you may have noticed that if you put in a text or symbols next to a view, they will stay behind if you want to move the view. Once the.

Inventor Drawing at GetDrawings Free download, This post is a must read for all new inventor users! How do you draw a 3d sketch in inventor? If you’ve used inventor for a while, you may have noticed that if you put in a text or symbols next to a view, they will stay behind if you want to move the view. It seems that you have.

Autodesk Inventor Tutorial 2D Drawing YouTube, It seems that you have created a sketch in the ipt environment and now you want to print just the sketch and include the sketch dimensions. You can copy autocad data to the clipboard and paste it into an inventor sketch, or import autocad files directly into an inventor sketch. You have to manually reposition it which can be time.

Inventor Drawing at GetDrawings Free download, Start in a drawing sketch. You will see like a matrix of each plane (x, y, z). In the graphics window, select the geometry to pattern. Importing autocad drawings to inventor. Within autocad you normally trim, extend, copy, mirror, hack, slash, and do whatever necessary to create the required geometry in as little of time.

Inventor Drawings Eric Allgood EPortfolio, Click on the ‘project geometry’ button and click on the center point. How do i import into inventor? Click in the graphic window to place the sketch on the sheet, or select a drawing view to associate the sketch to the view. Inventor sketches can include.bmp,.gif,.jpg, and.png images as well as excel workbooks and word documents. When you edit attributes.

Scooter Part 7 Orthographic Drawing Wheel YouTube, To copy dimensions, an alternative way is to use autocad: Subscribe to our blog for more tips like this one! Part models created in autodesk inventor start with sketches, which you create by drawing geometric elements such as points, lines, shapes, and arcs. If you want to draw a line in a sketch, you select the line button and then.

Inventor Drawings, Click corners to pivot the image. On the ribbon, click place views tab create panel base. You have to manually reposition it which can be time consuming if you attached many symbols in a view for example. At first, not much will look different between the 2d sketching and 3d sketching environments. To make the behaviour of your autodesk inventor.

Autodesk Inventor Practice Part Drawings Autodesk, Opening a sketck and drawing lines/ circles. Click in the graphic window to place the sketch on the sheet, or select a drawing view to associate the sketch to the view. Here you can edit the information that will appear in the lower box. It seems that you have created a sketch in the ipt environment and now you want.

Inventor Drawing at Explore, Steve bedder’s excellent post on naming, managing and displaying your parameters. Navigate to the folder that contains the image file and then click open. Leave a comment posted by inventor p on may 17, 2012. Add dims to document the model. On the 3d model tab, click start 2d sketch or start 3d sketch.

Pin on 3D Isometric, Click on the ‘project geometry’ button and click on the center point. Click a planar face or work plane of a part and, in the mini toolbar, choose create sketch. When you edit attributes of a hatch, all edits are kept as object overrides. In the rectangular pattern dialog box, click the selection tool under direction 1 and then select.

118 Inventor Drawing Tutorial Create Sketch on Drawings, Click in the graphic window to place the sketch on the sheet, or select a drawing view to associate the sketch to the view. Navigate to the folder that contains the image file and then click open. How do i import into inventor? Opening a sketck and drawing lines/ circles. If you want to draw a line in a sketch,.

Inventor 2020 Part Drawings YouTube, Part models created in autodesk inventor start with sketches, which you create by drawing geometric elements such as points, lines, shapes, and arcs. To copy dimensions, an alternative way is to use autocad: Start in a drawing sketch. If the part file contains: Inventor sketches can include.bmp,.gif,.jpg, and.png images as well as excel workbooks and word documents.

Change Inventor Drawing Sheet Color IMAGINiT, To create a sketch in a part or assembly file, do one of the following: You can copy autocad data to the clipboard and paste it into an inventor sketch, or import autocad files directly into an inventor sketch. It seems that you have created a sketch in the ipt environment and now you want to print just the sketch.
 Autodesk Inventor YouTube")
Fixture Block (Video Tutorial) Autodesk Inventor YouTube, In inventor, you need to attach a drawing sketch symbol to a view, a dimension, a balloon or a symbol so that it will move with that object. In part or assembly environments, existing sketches can be copied and pasted onto different planes or faces. Within a drawing, it is not possible to copy a sketch from a view to.

AutoDesk Inventor Drawing Views by Alejandro Flores at, When you are designing you will usually always start off with a 2d sketch. Create a new idw and place this 3d solid on the sheet. Subscribe to our blog for more tips like this one! Click corners to pivot the image. Opening a sketck and drawing lines/ circles.

Inventor Drawing at GetDrawings Free download, In a 2d sketch, select a planar face or work plane and then click image on the insert panel of the ribbon. Once the drawing is prepared you can see how to use this geometry to create a sketch in inventor using your data for each plane and create a 3d. In the model panel (top left) click ‘create 2d.

An Autodesk Inventor drawing of a complex part model, It will ask you to select a plane. Add dims to document the model. To create a sketch in a part or assembly file, do one of the following: You will see like a matrix of each plane (x, y, z). So to start off with a sketch click create 2d sketch.

Dimension and Draw Inventor Drawing Sheet YouTube, When you are designing you will usually always start off with a 2d sketch. Once the drawing is prepared you can see how to use this geometry to create a sketch in inventor using your data for each plane and create a 3d. Paste them into an inventor sketch. A draft sketch is a special drawing view that contains no.

Course Inventor 2018 Drawing Basic Online Courses from, How do you draw a 3d sketch in inventor? Window select all entities, right click copy go to new sheet. When you are designing you will usually always start off with a 2d sketch. Use commands on the sketch tab to create the sketch geometry. Opening a sketck and drawing lines/ circles.

Autodesk Inventor Tutorial 14 How to make Excavator, In the graphics window, click to place the view. You have to manually reposition it which can be time consuming if you attached many symbols in a view for example. How to convert a 2d sketch to a 3d sketch in inventor ? Navigate to the folder that contains the image file and then click open. Once the drawing is.