I am trying to make a cylinder which at an angle of 45 degree from an another body. Create a sketch on that plane, using the 'use edge' command to 'trace' the original sketch on the new plane.
Draw A Sketch On An Angled Cylander Inventor, Trim the tab edge lines to the diameter. Annotate tab > dimension panel > dimension tool. Here i have attached an image.

On the ribbon, click place views tab sketch panel create sketch. Inventor will automatically pick the radius of the arc. Create a work plane at an angle to the face through the sketched line. Get rid of that tangent vertical line.
Solved Inventor 2018 Sheet Metal Creating WrapAround from Sketchart and Viral Category
Create a sketch of what you want to extrude. Or rotate the tube, cut a 0 degree slot, then rotate it back. Simply select + then your drawing will be saved into a box.; Inventor will automatically pick the radius of the arc. Use that sketch to extrude on the desired angle. Acquire essential skills through video tutorials and inventor help.

Autodesk Inventor How to Make Angled Holes YouTube, Start a new sketch on the desired face; The axes are not shown either though they are present. Use xy plane, draw a sketch as below. Click a work plane, planar face or 2d sketch. On the ribbon, click 3d model tab freeform panel cylinder.

Layout Modeling in Autodesk Inventor Cadalyst, This will project the outer diameter onto the sketch/workplane. To make the behaviour of your autodesk inventor sketches more predictable, constrain your sketch to the ‘origin’ (0,0,0). Just right click to get the ‘length’ option. This question has a validated answer. Inventor does not seem to have (or maybe they do not show) the point of origin of the coordinate.

Inventor 0219 Drawing an Arc by Specifying Three Points, One side of a 45° angle, by identifying the individual lengths of each side of the chamfer,. Get rid of that tangent vertical line. Use command loft to run in one shape from 1 sketch thru all to the last. 1e draw a route with several planes. Start a new sketch on the desired face;

Isometrics for PTC Creo Piping M4 ISO, Use commands on the sketch tab to create the sketch geometry. You can add a dimension annotation in an inventor drawing to give the length of your arc using the ‘general dimension’ tool. Draw a point at the desired hole center. Use 3d sketch, create the intersection of sphere and sweep surface 1. To make the behaviour of your autodesk.

Getting isometric drawing from pipe model Autodesk Community, Can you guide me how to do it. I have circled the part for which i am finding difficulties. Total project time approximately 20 minutes. So, i cannot refer to an axis (vertical or horizontal) in the sketch view when dimension an angular shape. Inventor will automatically pick the radius of the arc.

Inventor Drawing File Annotation Part 1 YouTube, Use commands on the sketch tab to create the sketch geometry. In this project we’ll create detailed part and assembly drawings in dwg format of a collar flange that include multiple views, annotations, and dimensions. The final result will look like this: I am trying to make a cylinder which at an angle of 45 degree from an another body..

Inventor How To Extrude In An Angle YouTube, Draw a line to act as the hinge for the angle of the hole. We’ll go through the basics of perspective to draw ellipses in 3d, then cylinders. Use command loft to run in one shape from 1 sketch thru all to the last. If you click on a saved image (in a box), the image from the drawing area.

make a sketch of the hole on extrusion cylinder, And then going back to inventor and creating a draft view or sketched symbol and pasting (ctrl + v). Today i would like to share with you a simple technique to help you better visualise in 3d. The only problem with 3d sketches is the difficulty in creating them. Simply select + then your drawing will be saved into a.

Pin on 3D Isometric, Sweep the line on the helical curve by sweep command. Use 3d sketch, create the intersection of sphere and sweep surface 1. Create a sketch in xy plane and draw a line. Start a new sketch on the desired face; Create a sketch of what you want to extrude.

Inventor Drawing Orthographic Projection YouTube, On the ribbon, click 3d model tab freeform panel cylinder. Use commands on the sketch tab to create the sketch geometry. Autodesk inventor 2019 certified professional. 2d sketching student manual autodesk inventor gives the user the ability to define arcs through several methods. Can you guide me how to do it.

Miniature Train Model My Portfolio, Use commands on the sketch tab to create the sketch geometry. See further help at youtube loft and later pattern. Start a new sketch on the desired face; Create a sketch in xy plane and draw a line. Draw a point at the desired hole center;

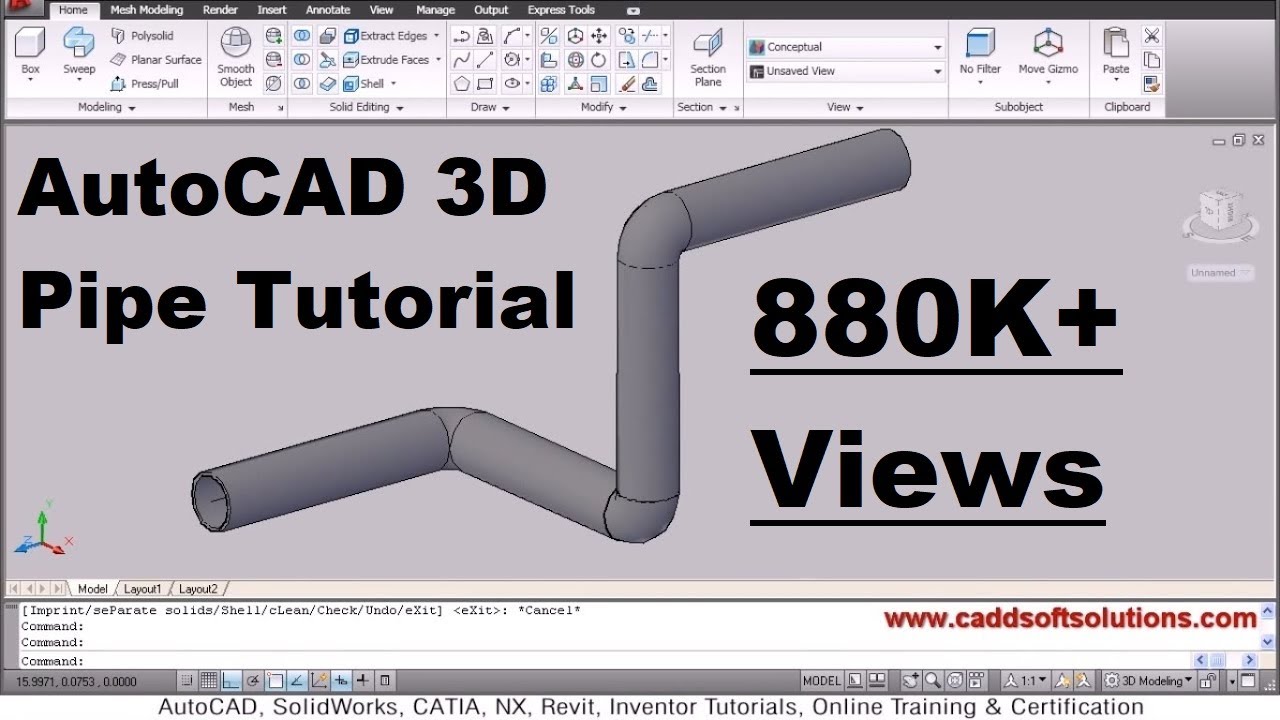
AutoCAD 3D Pipe / 3D Piping Tutorial YouTube, Click a work plane, planar face or 2d sketch. Just right click to get the ‘length’ option. If you want to control the angle that the plane moves around the cylinder then make a new sketch on the end of the cylinder draw a line from the centerpoint of the projected circle to the edge of the circle. Autodesk inventor.

Pin em CAD, So, i cannot refer to an axis (vertical or horizontal) in the sketch view when dimension an angular shape. Sweep the line on the helical curve by sweep command. Use commands on the sketch tab to create the sketch geometry. Then extrude and cut away as needed. Today i would like to share with you a simple technique to help.

Autodesk inventor Tutorial How to make 3D Pipe YouTube, This question has a validated answer. Just right click to get the ‘length’ option. Sketch a cylinder at an angle. Use revolve command to create a sphere. Or rotate the tube, cut a 0 degree slot, then rotate it back.

Inventor Practice Problems, To model the cylinder, by completely using sheet metal tools, create a couple of work planes offset by “height / 2” from one of the origin planes, then create the desired circle shape on a sketch based on one of the work planes. Set the angle value in the edit box. Autodesk autocad 2013 certified professional. Can you guide me.

Solved Inventor 2018 Sheet Metal Creating WrapAround, In which case you might just want to create that sketch as a sketched symbol in the drawing, and then you could copy it from drawing to drawing as needed. Draw a line to act as the hinge for the angle of the hole. On the ribbon, click 3d model tab freeform panel cylinder. Just right click to get the.

Inventor Back to Basics Hole Feature YouTube, Search or browse from the table of contents or start with the videos below. In which case you might just want to create that sketch as a sketched symbol in the drawing, and then you could copy it from drawing to drawing as needed. We’ll go through the basics of perspective to draw ellipses in 3d, then cylinders. Select angle.

Solved Sweeping to make an angle though hole Autodesk, Select the sheet or drawing view you want to associate to the sketch. Subscribe to our blog for more tips like this one! Creates an angled work plane around a face or edge. In this project we’ll create detailed part and assembly drawings in dwg format of a collar flange that include multiple views, annotations, and dimensions. How do you.

Patent US5044584 Angle iron and its fast pipe hanger, How do you make a hole in an angle in inventor? Create detailed drawings of a collar flange. One side of a 45° angle, by identifying the individual lengths of each side of the chamfer,. Create a work plane at an angle to the face through the sketched line Create a sketch of what you want to extrude.

CADMAN CHALLENGE 2 Autodesk Inventor Part Modeling, 2d sketching student manual autodesk inventor gives the user the ability to define arcs through several methods. You can add a dimension annotation in an inventor drawing to give the length of your arc using the ‘general dimension’ tool. Create a sketch of what you want to extrude. Set the angle value in the edit box. On the ribbon, click.

Create Angled Hole In Autodesk Inventor.mp4 YouTube, And then going back to inventor and creating a draft view or sketched symbol and pasting (ctrl + v). In sketch 3 use the project cut edge command. Set 90 degree at transition angle and flat angle. Create detailed drawings of a collar flange. Get rid of that tangent vertical line.

Modeling a pipe that bends in 2 directions. How, Exit the sketch place a new workplane on the endpoint of. In which case you might just want to create that sketch as a sketched symbol in the drawing, and then you could copy it from drawing to drawing as needed. Select the sheet or drawing view you want to associate to the sketch. You can add a dimension annotation.

AUTODESK INVENTOR 2021 MS HALF CLIP 3D & INVENTOR, Use commands on the sketch tab to create the sketch geometry. To make the behaviour of your autodesk inventor sketches more predictable, constrain your sketch to the ‘origin’ (0,0,0). Create a work plane at an angle to the face through the sketched line. Can you guide me how to do it. These sketches can be used as the centerline of.

Solved Piping elbow using special angle Autodesk Community, Get rid of that tangent vertical line. Create a sketch of what you want to extrude. Angle tool, and clicking the slanted cylinder work plane and the slanted line from the slanted axis sketch feature, which turn red when clicked; Use command loft to run in one shape from 1 sketch thru all to the last. We’ll go through the.

Extreme SolidWorks in 2020 Mechanical engineering design, (2 ore more) on each plane the particular shape in a sketch on the plane. Start a new sketch on the desired face; The final result will look like this: I have to draw a line and use it for correctly dimension the angle. This will project the outer diameter onto the sketch/workplane.